
Christmas Home Tour 2015
 Hello everyone and welcome to my Christmas home tour!
This year I wanted it to be my kind a story, copper, white and pastel.
So when you come in, you`ll be welcomed with our little Christmas tree and a snowy vignette in a box. Our small flocked Christmas tree is decorated with copper and pastel green, with a glittery star topper.Wooden box is dressed in a faux fur and filled with a fresh and faux branches, battery operated branches for little glow and all kind of pinecones. It`s set up on a small table, with just enough place to put your keys and phone when you come in. On the mirror are two garlands in a matching colors.
Hello everyone and welcome to my Christmas home tour!
This year I wanted it to be my kind a story, copper, white and pastel.
So when you come in, you`ll be welcomed with our little Christmas tree and a snowy vignette in a box. Our small flocked Christmas tree is decorated with copper and pastel green, with a glittery star topper.Wooden box is dressed in a faux fur and filled with a fresh and faux branches, battery operated branches for little glow and all kind of pinecones. It`s set up on a small table, with just enough place to put your keys and phone when you come in. On the mirror are two garlands in a matching colors.
Zdravo svima i dobro došli u moj praznični dom!
Ove godine sam odlučila da sve bude u mom stilu, dakle bakarno, belo i pastelno.
Kada dođete kod nas, dobrodošlicu će vam poželeti naša mala snežna jelka i mala zimska vinjeta u sandučiću. Snežna jelkica je okićena u bakarnim i pastelno zelenim tonovim sa sjajnom zvezdom na vrhu. Drveni sandučić sam "obukla" u veštačko krzno i napunila svežim i veštačkim granama, svetlećim granama za malo sjaja i raznim vrstama šišarki. Smestila sam je na mali stočić, na kome ostaje taman toliko mesta da spustimo ključeve ili telefone. Na ogledalu su dve girlandice u odgovarajućim bojama.

 In our living room I used white, copper and pastel pink for decorations. To make it more grounded, I have a little bit of black, just to make it less feminine. I didn`t wanted to make it too busy, so my decorations are very simple and very few. We spend most of our time here, so we want it to be simple and cosy. For centerpiece on my coffee table I just made lovely fresh wreath and put a candle in the middle. This way we have enough free space for coffe, tea or book (or to put up our feets :D).
Nijanse u dnevnom boravku su bakarna, bledo roze i belo. Da sve ne bude baš previše ženstveno, dodala sam tek malo crne koja daje potrebnu ravnotežu. Nisam htela da preterujem sa dekoracijama, zato su sve dekoracije vrlo jednostavne i nema ih mnogo. Ovo je soba u kojoj provodimo najveći deo vremena, zato je neophodno da nam bude udobno i bez mnogo gužve. Za centralni ukras na klub stolu napravila sam venčić od svežeg zelenila i dodala sveću u sredini. Tako nam ostaje dovoljno mesta da možemo da spustimo kafu, čaj ili knjigu (ili da dignemo noge :D).

 I dressed up my bar card for holidays with a gold ornaments, Christmas tree, glass angel and wrapped presents.
Malo sam doterala i bar za praznike sa zlatnim ornamentima, jelkom, staklenim anđelom i poklonima.
I dressed up my bar card for holidays with a gold ornaments, Christmas tree, glass angel and wrapped presents.
Malo sam doterala i bar za praznike sa zlatnim ornamentima, jelkom, staklenim anđelom i poklonima.

 For the Christmas tree skirt I used big faux fur blanket. It`s so good to use things we already have in a new way.
Umesto klasične suknjice za jelku, iskoristila sam ćebe od veštačkog krzna koje sam već imala. Super mi je kada mogu da iskoristim nešto što već imam u kući na nov način, umesto da kupujem nove stvari.

 On the mantel I put together a small vignette with a white garland, some ice branches, snowy garland, candlesticks, bottle brush Christmas trees and my dear lady. She`s wearing a small green crown to look more special.
Na kaminu je mala zimska scena nastala od belih girlandi, ledenih grančica, svećnjaka, mini jelki i moje drage dame. On je za ovu posebnu priliku dobila i zelenu krunu.
On the mantel I put together a small vignette with a white garland, some ice branches, snowy garland, candlesticks, bottle brush Christmas trees and my dear lady. She`s wearing a small green crown to look more special.
Na kaminu je mala zimska scena nastala od belih girlandi, ledenih grančica, svećnjaka, mini jelki i moje drage dame. On je za ovu posebnu priliku dobila i zelenu krunu.


 My favorite room this year is definitely our dining room! It looks like enchanted forest with this big garland full of fresh greenery and two big willow trees. I spruced up my garland with antlers, add few willow branches and it looked so masculine. To soften it, I added lovely glass ornaments and crystal snowflakes on the mirror.
Moja omiljena prostorija ove godine je svakako naša trpezarija! Meni izgleda kao začarana šuma sa tom ogromnom girlandom punom različitog svežeg zelenila i dva stabla breze. U girlandu sam dodala rogove i još malo brezovih grana i izgledala je baš muževno. Naravno, da se oseti i moj ženski duh, dodala sam staklene ornamente i kristalne pahulje na ogledalo.
My favorite room this year is definitely our dining room! It looks like enchanted forest with this big garland full of fresh greenery and two big willow trees. I spruced up my garland with antlers, add few willow branches and it looked so masculine. To soften it, I added lovely glass ornaments and crystal snowflakes on the mirror.
Moja omiljena prostorija ove godine je svakako naša trpezarija! Meni izgleda kao začarana šuma sa tom ogromnom girlandom punom različitog svežeg zelenila i dva stabla breze. U girlandu sam dodala rogove i još malo brezovih grana i izgledala je baš muževno. Naravno, da se oseti i moj ženski duh, dodala sam staklene ornamente i kristalne pahulje na ogledalo.
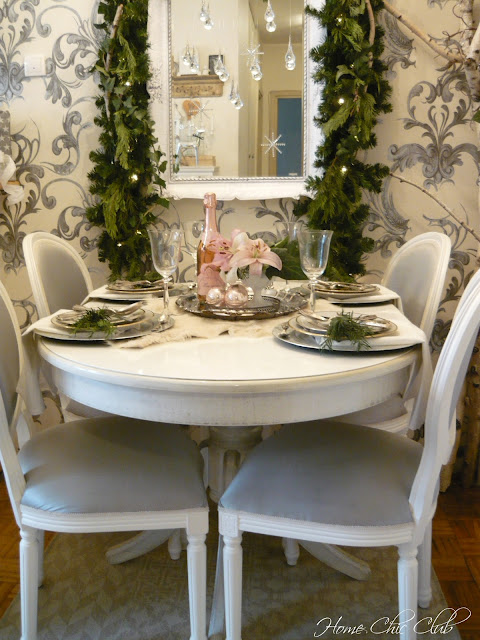
 For centerpiece on dining room table I put together fresh greenery and flowers in a DIY milk glass vase and adorned it with pastel pink ornaments on a mirrored tray. Finally I put everything on a big silver tray and call it a deal. Of course, bottle of champagne in a festive pastel pink packaging was just perfect for this setting.
Za sto u trpezariji sam napravila mali buket od svežeg zelenila i cveća u vazi od DIY mlečnog stakla i dodala par bledo roze kugli na malom poslužavniku. Za kraj sam sve to smestila na veliki srebrni poslužavnik. Naravno, boca šampanjca u svečanom bledo roze parkovanju je bila perfektan dodatak ovom aranžmanu.
For centerpiece on dining room table I put together fresh greenery and flowers in a DIY milk glass vase and adorned it with pastel pink ornaments on a mirrored tray. Finally I put everything on a big silver tray and call it a deal. Of course, bottle of champagne in a festive pastel pink packaging was just perfect for this setting.
Za sto u trpezariji sam napravila mali buket od svežeg zelenila i cveća u vazi od DIY mlečnog stakla i dodala par bledo roze kugli na malom poslužavniku. Za kraj sam sve to smestila na veliki srebrni poslužavnik. Naravno, boca šampanjca u svečanom bledo roze parkovanju je bila perfektan dodatak ovom aranžmanu.


 For this romantic holiday table setting I used my white plates with a gold border and silver cutlery and adorned it with just a fresh greenery.
Za ovaj romantični svečani sto koristila sam bele tanjire sa zlatnom obodom i srebrni escajg i sve ukrasila jednostavnim borovim grančicama.
For this romantic holiday table setting I used my white plates with a gold border and silver cutlery and adorned it with just a fresh greenery.
Za ovaj romantični svečani sto koristila sam bele tanjire sa zlatnom obodom i srebrni escajg i sve ukrasila jednostavnim borovim grančicama.


 Preety presents makes everything a little more fun and cute.
Lepo upakovani pokloni svakako doprinose da sve izgleda veselije i lepše.
Preety presents makes everything a little more fun and cute.
Lepo upakovani pokloni svakako doprinose da sve izgleda veselije i lepše.

 Since a deer become kind of a theme in our dining room, this guy find it`s way to a cabinet with some candlesticks and another lantern. This little guy you see in the middle is actually a DIY project on the wooden heart I had from last year. Another two on top of the shelf is another DIY glitter silhouette project.
Pošto je jelen nekako postao tema trpezarije, ovaj srebrni dečko je zauzeo centralno mesto na kabinetu uz svećnjake i još jednu lanternu. Ovaj mališa koga vidite u sredini je zapravo DIY projekat na drvenom srcu koje sam imala od prošle godine. Još jedan DIY gliter siluete projekat su o dva jelena u ramovima na polici.
Since a deer become kind of a theme in our dining room, this guy find it`s way to a cabinet with some candlesticks and another lantern. This little guy you see in the middle is actually a DIY project on the wooden heart I had from last year. Another two on top of the shelf is another DIY glitter silhouette project.
Pošto je jelen nekako postao tema trpezarije, ovaj srebrni dečko je zauzeo centralno mesto na kabinetu uz svećnjake i još jednu lanternu. Ovaj mališa koga vidite u sredini je zapravo DIY projekat na drvenom srcu koje sam imala od prošle godine. Još jedan DIY gliter siluete projekat su o dva jelena u ramovima na polici.

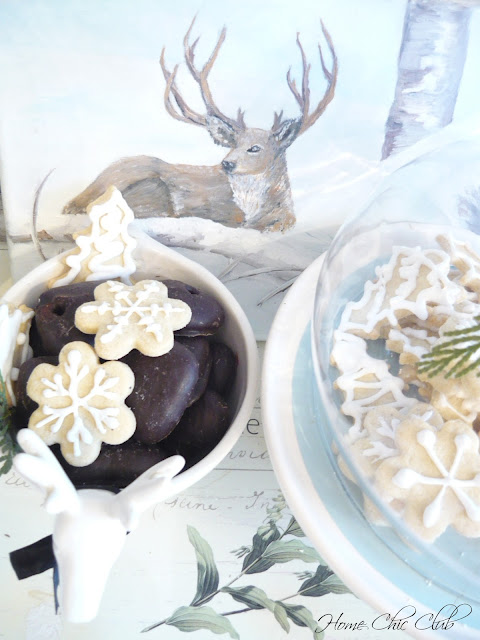
 I even baked my first Christmas cookies this year. This butter cookies in a shape of Christmas trees and snowflakes are so cute and tasty with a hot chocolate or tea.
Čak sam ispekla i prve ovogodišnje Božićne kolačiće. Ovaj buter keks u obliku jelke i pahulja sam pravila prvi put i jako nam se dopao uz toplu čokoladu ili čaj.
I even baked my first Christmas cookies this year. This butter cookies in a shape of Christmas trees and snowflakes are so cute and tasty with a hot chocolate or tea.
Čak sam ispekla i prve ovogodišnje Božićne kolačiće. Ovaj buter keks u obliku jelke i pahulja sam pravila prvi put i jako nam se dopao uz toplu čokoladu ili čaj.

To go with a theme in the kitchen too, I added just a few simple details, like little greenery in a pitcher and a snowflakes.
My all year around wreath find it`s place under the hood and Noel sign on top of cupboard.
Pretty deer painting seems to be perfectly right for the kitchen and the theme. This salt and paper shakers was too cute to pass them so I had to buy them.
A da bi sve teklo u istom ritmu i u kuhinji je sve svedeno na nekoliko detalja. Malo zelenila i par pahulja.
Venčić koji stoji čitave godine u kuhinji je pronašao svoje mesto ispod aspiratora a Noel natpis na vrhu kuhinjskih ormarića.
Slika jelena mi je izgledala kao stvorena za temu i kuhinju a ova dva jelena za so i biber su mi bili toliko slatki da sam morala da ih kupim.


Finally, we wish you a Marry Christmas and many happy memories with your family and friends!!
Za kraj mi ostaje da vam poželim srećne praznike i puno lepih trenutaka sa porodicom i prijateljima.
Featured on


Hello everyone and welcome to my Christmas home tour!
This year I wanted it to be my kind a story, copper, white and pastel.
So when you come in, you`ll be welcomed with our little Christmas tree and a snowy vignette in a box. Our small flocked Christmas tree is decorated with copper and pastel green, with a glittery star topper.Wooden box is dressed in a faux fur and filled with a fresh and faux branches, battery operated branches for little glow and all kind of pinecones. It`s set up on a small table, with just enough place to put your keys and phone when you come in. On the mirror are two garlands in a matching colors.
Zdravo svima i dobro došli u moj praznični dom!
Ove godine sam odlučila da sve bude u mom stilu, dakle bakarno, belo i pastelno.
Kada dođete kod nas, dobrodošlicu će vam poželeti naša mala snežna jelka i mala zimska vinjeta u sandučiću. Snežna jelkica je okićena u bakarnim i pastelno zelenim tonovim sa sjajnom zvezdom na vrhu. Drveni sandučić sam "obukla" u veštačko krzno i napunila svežim i veštačkim granama, svetlećim granama za malo sjaja i raznim vrstama šišarki. Smestila sam je na mali stočić, na kome ostaje taman toliko mesta da spustimo ključeve ili telefone. Na ogledalu su dve girlandice u odgovarajućim bojama.


In our living room I used white, copper and pastel pink for decorations. To make it more grounded, I have a little bit of black, just to make it less feminine. I didn`t wanted to make it too busy, so my decorations are very simple and very few. We spend most of our time here, so we want it to be simple and cosy. For centerpiece on my coffee table I just made lovely fresh wreath and put a candle in the middle. This way we have enough free space for coffe, tea or book (or to put up our feets :D).
Nijanse u dnevnom boravku su bakarna, bledo roze i belo. Da sve ne bude baš previše ženstveno, dodala sam tek malo crne koja daje potrebnu ravnotežu. Nisam htela da preterujem sa dekoracijama, zato su sve dekoracije vrlo jednostavne i nema ih mnogo. Ovo je soba u kojoj provodimo najveći deo vremena, zato je neophodno da nam bude udobno i bez mnogo gužve. Za centralni ukras na klub stolu napravila sam venčić od svežeg zelenila i dodala sveću u sredini. Tako nam ostaje dovoljno mesta da možemo da spustimo kafu, čaj ili knjigu (ili da dignemo noge :D).


I dressed up my bar card for holidays with a gold ornaments, Christmas tree, glass angel and wrapped presents.
Malo sam doterala i bar za praznike sa zlatnim ornamentima, jelkom, staklenim anđelom i poklonima.


Umesto klasične suknjice za jelku, iskoristila sam ćebe od veštačkog krzna koje sam već imala. Super mi je kada mogu da iskoristim nešto što već imam u kući na nov način, umesto da kupujem nove stvari.


On the mantel I put together a small vignette with a white garland, some ice branches, snowy garland, candlesticks, bottle brush Christmas trees and my dear lady. She`s wearing a small green crown to look more special.
Na kaminu je mala zimska scena nastala od belih girlandi, ledenih grančica, svećnjaka, mini jelki i moje drage dame. On je za ovu posebnu priliku dobila i zelenu krunu.


My favorite room this year is definitely our dining room! It looks like enchanted forest with this big garland full of fresh greenery and two big willow trees. I spruced up my garland with antlers, add few willow branches and it looked so masculine. To soften it, I added lovely glass ornaments and crystal snowflakes on the mirror.
Moja omiljena prostorija ove godine je svakako naša trpezarija! Meni izgleda kao začarana šuma sa tom ogromnom girlandom punom različitog svežeg zelenila i dva stabla breze. U girlandu sam dodala rogove i još malo brezovih grana i izgledala je baš muževno. Naravno, da se oseti i moj ženski duh, dodala sam staklene ornamente i kristalne pahulje na ogledalo.


For centerpiece on dining room table I put together fresh greenery and flowers in a DIY milk glass vase and adorned it with pastel pink ornaments on a mirrored tray. Finally I put everything on a big silver tray and call it a deal. Of course, bottle of champagne in a festive pastel pink packaging was just perfect for this setting.
Za sto u trpezariji sam napravila mali buket od svežeg zelenila i cveća u vazi od DIY mlečnog stakla i dodala par bledo roze kugli na malom poslužavniku. Za kraj sam sve to smestila na veliki srebrni poslužavnik. Naravno, boca šampanjca u svečanom bledo roze parkovanju je bila perfektan dodatak ovom aranžmanu.


For this romantic holiday table setting I used my white plates with a gold border and silver cutlery and adorned it with just a fresh greenery.
Za ovaj romantični svečani sto koristila sam bele tanjire sa zlatnom obodom i srebrni escajg i sve ukrasila jednostavnim borovim grančicama.


Preety presents makes everything a little more fun and cute.
Lepo upakovani pokloni svakako doprinose da sve izgleda veselije i lepše.


Since a deer become kind of a theme in our dining room, this guy find it`s way to a cabinet with some candlesticks and another lantern. This little guy you see in the middle is actually a DIY project on the wooden heart I had from last year. Another two on top of the shelf is another DIY glitter silhouette project.
Pošto je jelen nekako postao tema trpezarije, ovaj srebrni dečko je zauzeo centralno mesto na kabinetu uz svećnjake i još jednu lanternu. Ovaj mališa koga vidite u sredini je zapravo DIY projekat na drvenom srcu koje sam imala od prošle godine. Još jedan DIY gliter siluete projekat su o dva jelena u ramovima na polici.


I even baked my first Christmas cookies this year. This butter cookies in a shape of Christmas trees and snowflakes are so cute and tasty with a hot chocolate or tea.
Čak sam ispekla i prve ovogodišnje Božićne kolačiće. Ovaj buter keks u obliku jelke i pahulja sam pravila prvi put i jako nam se dopao uz toplu čokoladu ili čaj.

To go with a theme in the kitchen too, I added just a few simple details, like little greenery in a pitcher and a snowflakes.
My all year around wreath find it`s place under the hood and Noel sign on top of cupboard.
Pretty deer painting seems to be perfectly right for the kitchen and the theme. This salt and paper shakers was too cute to pass them so I had to buy them.
A da bi sve teklo u istom ritmu i u kuhinji je sve svedeno na nekoliko detalja. Malo zelenila i par pahulja.
Venčić koji stoji čitave godine u kuhinji je pronašao svoje mesto ispod aspiratora a Noel natpis na vrhu kuhinjskih ormarića.
Slika jelena mi je izgledala kao stvorena za temu i kuhinju a ova dva jelena za so i biber su mi bili toliko slatki da sam morala da ih kupim.


Finally, we wish you a Marry Christmas and many happy memories with your family and friends!!
Za kraj mi ostaje da vam poželim srećne praznike i puno lepih trenutaka sa porodicom i prijateljima.
Featured on
Featured on

Christmas decoration ideas - DIY Frosted Candle Holders

What can make house filled with Christmas and winter spirit more then a candles burning all around. I love candles. Gentle lights and soft shades on the walls makes me day dreaming all day long and feel so cosy. While I`m making a hot chocolate for my boys, soft Christmas music is playing and beautiful smells are spreading all around the rooms. Everything looks so festive and I find myself thinking: Life is good!
Who doesn`t love this time of the year?!
It`s time to enjoy with family and friends. It`s time for giving and receiving love and time for presents!
This frosted and glitter candle holders are so pretty both for winter and Christmas time and they are so easy to make. They can be a great DIY present and it cost you just a little love and patience. So let`s get started with a tutorial.
Šta može učiniti dom svečanijim za vreme zime i praznika od sveća koje trepere svuda. Obožavam sveće. Njihova nežna svetlost i meke senke na zidovima bude maštu i sanjarenje. Dok spremam toplu čokoladu za moje dečake, sa radija dopiru meki zvuci starih Božićnih pesama a predivan miris koji se širi domom čini sve lepšim i svečanijim i u tom trenutku moram da pomislim kako je život lep.
Pa kako onda da ne volim ovo doba godine?!
Vreme uživanja sa porodicom i prijateljima, stvoreno za opuštanje i darivanje.
Ove zamrznute, svetlucave tegle - svećnjaci su podjednako lepe za celu zimu a i praznike, a prave se tako lako. Mogu da budu divan poklon vašim najdražima, poklon koji ste sami napravili, a koji vas skoro ništa nije koštao, osim malo ljubavi i strpljenja. Krenumo sa tutorijalom.
You will need:
Jars
Painters tape
Wire (I used gold flower wire)
Ribbon of your choice
Toothpaste
Sponge brush
Materijal:
Tegle
Molerska traka
Žica (ja sam koristila zlatnu cvećarku žicu)
Ukrasna traka po izboru
Pasta za zube
Sunđerasta četkica ili komad sunđera

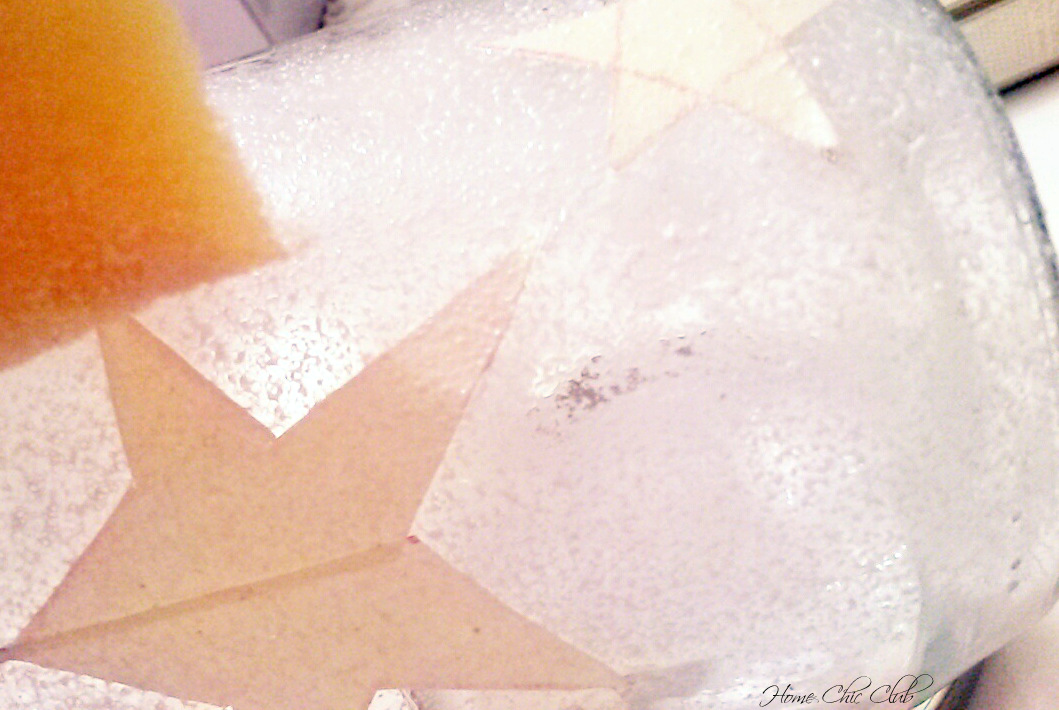
First cut the desired shape out of painters tape and stick it on your jar. It can be stars, deer, hearts, Christmas tree, snowflakes...
Prvo isecite od molerske trake željene oblike i zalepite na teglu. To mogu biti zvezde, jeleni, srca, jelke, pahulje...

Use a sponge brush or a piece of sponge and apple a toothpaste on the jar. I recommend to do it in a tapping motion. While it`s still wet, sprinkle glitter to make it more shine. Let it dry for 10-15 min.
Sunđerastom četkicom ili parčetom sunđera nanesite pastu za zube na teglu. Preporučujem da to radite tapkajućim pokretima. Dok je pasta još vlažna poprskajte gliterom za lepši sjaj. Ostavite da se suši oko 10-15 min.

When it`s dry, add a coat of clear spray varnish to make it more permanent. Add ribbon and make a bow. Now is the time to make a handle out of wire. Band wire around the jar to measure it. Make one end longer (about 2/3).
Osušenu teglu poprskajte lakom u spreju kako bi sve učinili trajnijim. Oko ruba tegle vežite traku i završite lepom mašnom. Sada je vreme da napravite držač. Savijte žicu oko tegle ostavljajući jedan kraj dužim (oko 2/3).

Using pen or your finger make small loop on one side.
Koristeći se olovkom ili prstom, napravite malu omču na jednom kraju.

Put a wire back on a jar and twist the other end on the opposite side...
Vratite žicu na teglu i učvrstite na drugom kraju...

and make the other loop...
i od ostatka žice napravite drugi obruč...


Bend the wire in a arch form and put the end through the loop. Bend again to secure it. Use two wires for bigger jars.
Presavijte žicu lučno i provucite kraj žice kroz obruč. Savijte kraj koji ste provukli da sve osigurate i gotovo! Koristite dve žice za veće tegle.

Light your candles and you are done!
Upalite sveće i uživajte!


10 Simple Steps to Creating the Perfect Christmas Tree


Perfect Christmas tree is a most beautiful feature in every home for holidays. But sometimes, even we invested in great tree, lovely ornaments and put a lot of effort, it doesn`t come out like we wanted. The secret of well designed trees is not in a carefully selected decorations, ribbons and ornaments. No, it`s in a several simple steps which works every time. So, I decided to reveal all my tips and tricks to help you to do it easy and stress free. Hope this will help your Christmas tree to shine and be a star of holidays.
Savršena jelka je najlepši ukras svakog prazničnog doma. Ali i pored toga što smo uložili mnogo truda, kupili lepe ukrase i kvalitetnu jelku, ona na kraju ne izgleda kao ono savršenstvo kakvo smo videli na fotografijama... Tajna dizajniranih jelki nije samo u pažljivo odabranim ukrasima, girlandama i ukrasnim trakama. Iz sopstvenog iskustva tvrdim da je tajna uspešno i prelepo okićene jelke u nekoliko pravila, koja kada se primene daju odličan rezultat. Otkriću vam sve trikove koje sam do sada naučila da biste jelku okitili lako i bez stresa. Nadam se da će to pomoći da vaša jelka ove godine zablista i bude zvezda prazničnih večeri.
Step 1.
Fluffing the branches. If you have a faux tree this step is so important! Adjusting and fluffing the branches will make your tree look more natural and full, and also much more beautiful! Another tip: wear gloves because the branches can be harsh.
Korak 1.
Raspoređivanje grana. Ako imate veštačku jelku ovaj korak je jako važan. Razdvojite i rasporedite sve grane da jelka izgleda prirodnije i bogatije. Takođe će izgledati i mnogo lepše! Još jedan savet: nosite rukavice dok ovo radite jer grane umeju da budu oštre.


Step 2.
Put the lights on. If your tree is not pre-lit, now is the time to put your lights on the tree. Best way to do it is to wrap the light strand around branches, working from the end of the branch to the tip and back. When you reach to the end of the branch, start next branch. This way you`ll avoid having visible cords. Another great tip is to stick extension cord (with a lot of sockets) inside of your tree (somewhere in the middle). It will allow you to switch and distribute your lights better and ugly extension cord will be hidden!
Korak 2.
Stavite sijalice. Ako jelka nije bila osvetljena kada ste je kupili, sada je vreme da postavite sijalice. Najbolji način da se to uradi je da sijalice namotavate oko grana, polazeći od vrha grane i krećući se ka umutrašnjosti jelke. Kada stignete do kraja jedne grane, jednostavno pređite na sledeću. Na ovaj način ćete izbeći da vam ružni kablovi koji vise između grana bidu vidljivi. Unutar jelke (negde na polovini visine) provucite i zalepite lepljivom trakom za osnovu jelke produžni gajtan (sa što više utičnica). To će vam omogućiti da sijalice neprimetno uključite unutar jelke, da ih bolje rasporedite, a ružni produžni gajtan i svi ostali kablovi će biti sakriven od pogleda.


Step 3.
Create a show-stopping topper. You can put your favorite topper, like angel or star, but I like a show-stopping topper and make it myself every year. Start by making arrangement of picks, sprays, flowers or any other ornament you like, then add a big bow and there you go. For the better look I always makes two bows, one on each side of my topper. This way tree will look beautiful both front and back.
Korak 3.
Postavite vrh jelke. Za vrh možete koristiti klasičan vrh, zvezdu, anđela i sl., ali ja volim da napravim moj vrh sama svake godine. Prvo napravite lep aranžman od svetlucavih grančica, grančica sa bobicama, cvetova ili nekih ornamenata i sve završite velikom mašnom (kao one koje se kupuju za poklone). Za bolji utisak napravite dve velike mašne i spojite ih sa prednje i zadnje strane na aranžman da bi jelka lepo izgledala sa svih strana.


Step 4.
Add wired ribbon. Wrapping cascading strands of wired ribbon (I like to use two or three ribbons together) around the tree will draw the eye from the top to the bottom of your tree. Also, you can create number of small bows and put it throughout the tree to make it more beautiful and coordinated. If you have a faux tree, use branches to fix everything in place, or use floral wire for natural tree.
Korak 4.
Postavite ukrasne trake. Koristite trake sa ugrađenom žicom jer su one savitljive i možete im davati željeni oblik. Nekoliko ukrasnih traka spojite i zajedno ih obmotavajte kaskadno od vrha do kraja jelke. Ja volim da koristim dva ili tri struka različitih traka zajedno, ali to je stvar izbora. Takođe možete napraviti nekoliko ukrasnih mašni od istih traka i strateški ih postaviti po drvetu da bi sve izgledalo bolje koordinirano i lepše. Ako imate veštačku jelku, koristite grančice da traku fiksirate (jednostavno obmotajte - presavijte granu oko trake i ponovo je ispravite), a ako je prirodna korisite se uskim trakama ili cvećarskom žicom.


Step 5.
Add ornaments. My best tip for this step is to put ornaments inside of the tree first. Use cheap glitter or shiny ornaments. This step will fill all the gaps inside the tree and make it more three dimensional and interesting since your eye will travel inside and out of the tree.
Korak 5.
Postavite ukrase. Moj najbolji savet za ovaj korak je da postavite prvo ukrase unutar jelke, birajući jeftine kugle sa gliterom ili druge koje lepo reflektiju svetlost. Na ovaj način ćete popuniti sve eventulne praznine unutar jelke, a ona će izgledati trodimenzionalnije jer će oko posmatrača putovati od unutrašnjosti jelke ka spolja i obrnuto.


Step 6.
Arranging the ornaments. Use assortment of ornaments for one tree. Big ornaments for the bottom, medium for the middle and small for the top of the tree. Best tip for this step is to make triangles out of ornaments. After making first one, keep going up making new ones always using one angle of your previous triangle to start next one.
Korak 6.
Aranžiranje ukrasa. Birajte velike ukrase za dno, ukrase srednje veličine za centralni deo jelke i najmanje za vrh jelke. Trik za ujednačeno raspoređivanje ukrasa je da ih postavljate u obliku zamišljenog trougla. Nakon što ste postavili ukrase u obliku prvog trougla, nastavljajte trouglove jedan na drugi, uvek počinjući od jednog već postojećeg ugla i formirajte zamišljene trouglove sve do vrha jelke.


Step 7.
Showcase your favorite ornaments and add a element of surprise. After putting basic ornaments on the tree, now is the time to showcase your favorites. Trick to make it even more special is to add something unexpected like family photos in a small decorative frames, little lanterns with battery operated candles, toys, diy ornaments etc.
Korak 7.
Pokažite svoje omiljene ukrase i dodajte element iznenađenja. Nakon postavljanja bazičnih kugli, vreme je da pokažete svoje najlepše ukrase. Trik da ga učinite još više ličnim i posebnim je da koristite nešto neuobičajeno kao što su fotografije članova porodice u malim ramovina, mali fenjeri sa svećama na baterije, igračke, oranamente koje ste sami napravili itd.


Step 8.
Add picks and sprays. Fill the tree with sparkling picks and sprays, branches with faux ice crystals or snow, flowers, or just use natural branches (they will smell beautiful!) I love to use pinecones too. Paint the tips of pinecones white acrylic paint and sprinkle it with white and silver glitter to make them look snowy and beautiful.
Korak 8.
Popunite sve praznine veštačkim granama sa kristalima leda ili snega, svetlucavim grančicama, cvetovima ili prirodnim granama koje možete ubrati u dvorištu ili parku a ujedno će i mirisati predivno. Lep detalj koji ja koristim su i šišarke. Obojite ih akrilnom belom bojom po ivicama i pospite belim i srebrnim gliterom kako bi izgledale kao da je po njima pao sneg.


Step 9.
Finishing touches. Finish the Christmas tree with glass (or acrylic) icicles on the tips of the branches to create the perfect winter wonderland look of your tree.
Korak 9.
Dovršite kićenje jelke dodavanjem staklenih (ili akrilnih) ledenica na vrhove grana čime ćete dočarati savršen zimski izgled vaše jelke.


Step 10.
Tree skirt. Last step is to add three skirt to your tree. Be imaginative with this step. Of course, you can use traditional skirts, but also you can put burlap, faux fur or any other fabric for the skirt. Also, you can put your tree in the some kind of container (tin bucket, woven basket, outdoor decorative urn...), or make it more interesting by putting it on something interesting like sleds...
Korak 10.
Poslednji korak je da stavite suknjicu. Možete koristiti klasičnu kupovnu suknjicu ali možete koristiti i neki drugi materijal po vašem izboru kao što je juta, veštačko krzno ili neka druga dekorativna tkanina. Takođe možete jelku smestiti u neku zanimljivu posudu, kao što je limena kofa, pletena korpa, dekorativna urna ili je učiniti zanimljivijom tako što je nećete staviti na pod već na nešto zanimljivo - sanke na primer.


Ostalo vam je samo da uključite lampice, podignite noge i uz topli napitak uživate u pogledu na vašu savršenu jelku.


10 Christmas Color Schemes - Christmas Decoration Ideas


As Christmas is slowly coming to our mind, we start to think what color of decoration to use this year? The key to successful Christmas decor lies in the proper color scheme. In order to choose a proper color I always think about what colors I already have in my house. So I can use colors that match or nicely contrast our interior design. To create harmonious look I think about what look and mood I want to achieve.
Am I going to tell you which colors I`m going to use this year? Most likely it`s going to be white and pastels in my living room and red and white in dining room and kitchen. :)
1. White on White
White on white Christmas decor is great for a very frosty look. Silver, metallics or glass can add shimmer to the room and make holiday appearance more festive. A muted palette of whites and soft grays allows little details to take center stage. To make this scheme shine, use different textures and materials.


2. White and Pastels
If you like neutrals, use white and pastel Christmas decorations and you`ll achive beautiful, romantic and elegant feel in your home. If you need inspiration, go check some of the most beautiful ideas on the French Country Cottage, Craftberry Bush or Pinterest.


3. White and Brown
Play up a neutral living room for the holidays with brown, gold, and silver accents. A frosted Christmas tree will be amazing with oversize silver and gold ornaments and white and brown wrapped packages placed neatly beneath the tree. On a coffee table place apothecary jars filled with Christmas cookies and decorate with candies and greenery.


4.White and Blue
Perfect way to mimic the icy colors of winter is to use blue and white Christmas color scheme. Accent Christmas tree with blue velvet ribbon and place clear and blue apothecary jars or bottles on the mantel for cool pops of color. Hang light blue stockings from your mantel and add packages wrapped in blue and white to complete the color scheme.


5. Silver and Gold
Christmas decor will absolutely shine with this pretty silver and gold color scheme. Mantel decorated with a silver and gold ornament ball wreath, cream stockings and greenery will make a focal point in the room. On a coffee table add cloches and apothecary jars filled with left over ornaments for decorative touch. Adorn a frosty Christmas tree with silver, gold, and white ornaments and display gorgeous wrapped packages to create a festive look that sparkles.


6. Red, White, and Green
If you prefer a more traditional approach to holiday decorating, red and white color scheme with pops of green are perfect choice. This scheme makes every home feel festive and fun. Play up with holiday poinsettias, a ceramic dish filled with red and white ornaments in different shapes and sizes, and adorn your sofa with holiday inspired accent pillows and cosy blanket for a total holiday look.


7. Black and White (with Gold)
Modern approach to decorating for Christmas in black and white will be perfect for minimalism lovers. Elegance of black and white will be enchanted if you add a little touch of gold. Overall impression will be festive but yet moderate. Play this combination with black and white striped ribbon wrapped around a flocked Christmas tree and decorated with interesting ornaments.


8. Country Charm Color Scheme
Want country charm in your living room? Use burlap banners, galvanized bucket and lantern ornaments. Make original and lovely ornaments by creating custom tags with written messages or photos. Play up with great finds like vintage window frame. Dress it up with a boxwood wreath, a group of bottlebrush trees, and a few fresh magnolia leaves. Accent with grouping of shiny mercury glass pieces.


9. Rustic Color Scheme
By using wooden ornaments, dried flowers, leaves, wooden beads, sticks and pine codes you can provide a rustic color theme in your home. Use a hint of evergreen to give life to the decor. Cover the Christmas tree with wooden ornaments to enhance the overall rustic color scheme. Use golden color to make more festive look and whites which can provide a contrasting effect.


10. Multicolor
If the room is decorated in neutrals and pastels Christmas decorations can be a great way to add a splash of color and enjoy brights for holidays. Choose reds, purples, aqua, royal blue and pinks. Benefit: no need to bye new ornaments and decorations. Just use all your holiday ornaments like Santa, snowflakes, balls and stockings to create a super festive and fun tree.


What is your color scheme this year? :)

No comments:
Post a Comment