This plain wooden box was perfect for shabby chic storage. So I decided to give it a makeover and turn it into a shabby chic box for cookies and sweets. Because, who doesn`t love a delicious cookie served with afternoon tea or coffee.
You will need:
- black, white, gold and silver acrylic paint
- candle
- laser printed image of your choice
- decoupage glue or modge podge
- send paper
- little bit of water and brush or sponge
- black, white, gold and silver acrylic paint
- candle
- laser printed image of your choice
- decoupage glue or modge podge
- send paper
- little bit of water and brush or sponge
Tutorial:
First step is to paint the box with black acrylic paint (to achieve the shabby effect later on).
First step is to paint the box with black acrylic paint (to achieve the shabby effect later on).
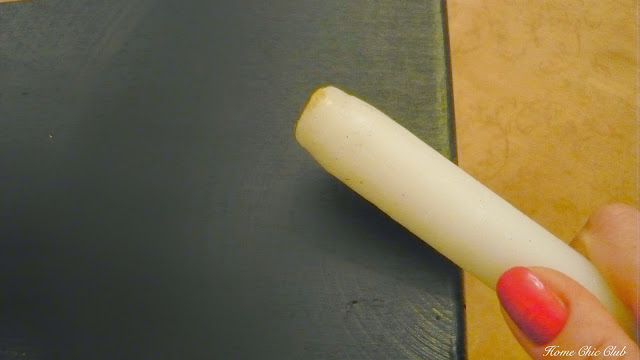
After the black paint is completely dry, rub the edges of the box (or everywhere you like) with candle to make sanding later easier. This step will give cute shabby look to the box.
Next, paint the box with white acrylic paint in two coats and sand with a sand paper on the spots where candle was applied.
Paint the interior of the box with the gold and silver (or any color you like).
Now is the time to transfer the image on the box. First, apply glue to the image on the printed side (make sure to use a laser print for this technique).
Glue the image to the box (printed side on the box) and let it dry completely.
Soak image with water (use sponge or brush) and start rubbing gently with your fingers. Rub off the layer upon layer of paper, so at the end you`ll end up with the image only.
You can see here how I take off the first layer of paper.
You can also decorate the interior of the box, if you like. I decorated mine with two angels.
Finally, finish your decorated box with a layer of clear acrylic lacquer. I also additionally decorated mine with lace ribbon and pearls.
Finally put your favorite cookies and sweets into the box and enjoy your coffee!
P I N T H I S F O R L A T E R!!
Follow me on Pinterest HERE.
Find more DIY Projects HERE.
_______________
keep in touch!
Love FREE printables?
Sign up for my email subscriber list and get your free
Daily and Weekly To Do List, Free Fitness Planner Printable,
The Ultimate Packing List
and much more to come.
Subscribers Only!


kutija je divna,reci mi gdje si nabavila sliku za preslikavanje .
ReplyDeleteThe Graphics Fairy LLC-besplatne vintaz fotografije
DeleteHvala draga. Odgovor si već dobila, tamo sam pronašla sve ove slike. :)
DeletePredivno si preuredila kutiju i napravila tutorijal.
ReplyDeleteLp; Sonja.
Hvala Sonja.
DeleteSrdačan pozdrav!
Ovo je odrađeno majstorski !!!
ReplyDeleteNe mislim samo na kutiju kao kutiju, već i na ceo tutorijal. Ma,....sjajno!!! Pre svega što nema razloga da ti postavim bilo kakvo pitanje, jer je sve jasno ako se pažljivo pročita, a drugo - naučiti nešto novo od čega ćeš imati višestruke koristi je neprocenjivo.
Hvala Vesna. ♥
Hvala cico, mada sam možda neke delove tutorijala mogla bolje da objasnim ili fotografišem, ali sam to radila sinoć kasno i bila sam umorna, pa nije ni čudo. ♥
DeleteOdlicno.Ali ja radim acetonom i mnogo je jednostavnije.Pozdrav
ReplyDeleteHvala draga. Znam i ta tu tehniku, ali sam htela i ovo da probam. Hvala ti na savetu u svakom slučaju. :)
Deletestvarno impresivno! jako jako mi se sviđa! super će ti se uklopiti u tvoj dom, već vidim ;)
ReplyDeleteHvala Ana. Već se uklopila i dobila slatke sadržaje. :)
DeleteSuch a beautiful box. Thanks tons for linking to Inspire Me. Hugs, marty
ReplyDeleteThank you Marty.
DeleteHugs!
Hola Vesna very beautiful box.. Me encanta esa patina negra y despues el blanco y el Diy con vela .. Genial
ReplyDeleteThanks Angelica! :)
DeleteHow very pretty! Love the way you aged the box. I found you at Ivy and Elephants. Have a great weekend!
ReplyDeleteThank you so much Deborah!
DeleteHave a lovely weekend too!
The box has been aged to perfection. Beautiful patina - love the graphics.
ReplyDeleteThanks Donna!!
DeleteAbsolutely enchanting Vesna - I just love how this turned out - marvelous tutorial - I will be featuring your post in this weeks A Return to Loveliness,
ReplyDeleteKathy
Thank you so much Kathy! Have a lovely week!!
Delete